SAND: Raiders of Sophie Guide logoSAND: Raiders of Sophie
Map & Locations

SAND: Raiders of Sophie Map - Locations & Routes

SAND: Raiders of Sophie Map & Locations is a visual field reference for identifying terrain, landmark types, extraction pressure, and places that change how a run feels.

Last updated: 2026-06-26. This is a regional navigation illustration, not a claim of fixed coordinates in SAND's procedural desert.
Location Types5Route Plans3Source Links5
SAND: Raiders of Sophie Trampler crossing Sophie desert

Sophie regional field map

Explore a SAND: Raiders of Sophie map overview of landmark types reported in current guides. Select a marker for its field brief; positions show terrain context, not fixed spawn coordinates.

SAND: Raiders of Sophie ruins and desert route screenshot from Steam
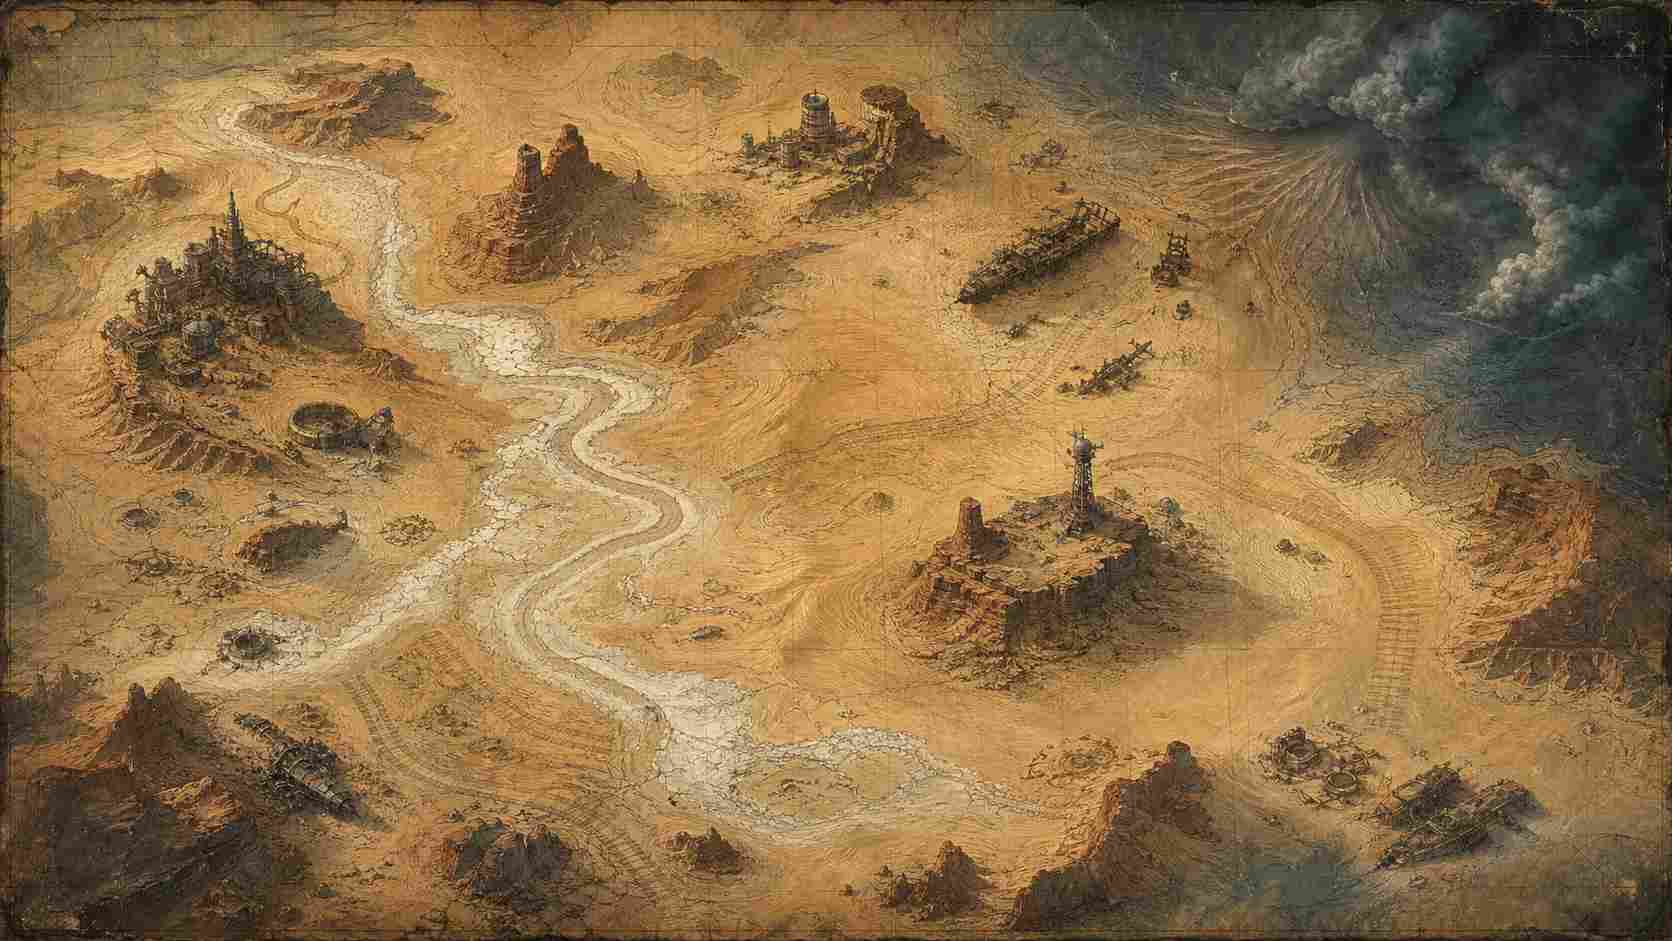
High value / contested

Named Points of Interest

Named POIs are the most reliable places to search for rare safes, Upior activity, containers, and route-defining loot. They are also obvious objectives for other crews.

Route Use
Best used as a planned stop: park with a retreat path, clear quickly, move loot back to the Trampler, then decide whether to leave or chain into a second POI.
Evidence
GamesRadar reports Coral Chunks from rare valuables safes usually found in named POIs, and Weird Coral from Upiors often found near POIs.
SAND: Raiders of Sophie desert Trampler screenshot from Steam
Variable / opportunistic

Wreck Fields and Random Shipwrecks

Wrecks can be quick loot checks while crossing Sophie. They are not a guaranteed route anchor, but they can pull crews off their original path.

Route Use
Treat wrecks as optional. Stop only if your Trampler can turn out cleanly and your current cargo is not already worth extracting.
Evidence
GamesRadar notes Upiors can occasionally appear at random shipwrecks, making wrecks relevant even when they are not named POIs.
SAND: Raiders of Sophie Trampler combat screenshot from Steam
Endgame / ambush-prone

Evacuation Zones and Radio Towers

Evacuation is handled through radio towers marked by a white door-style map icon. Calling extraction creates a dangerous final phase rather than an instant exit.

Route Use
Identify two possible exits before your cargo is full. Scout the approach, call the radio only when your Trampler can still move, then commit to the cable window.
Evidence
GamesRadar states the radio tower icon appears as a white circular door symbol; after activation, players wait 90 seconds for the dropship and then have 60 seconds to board.
SAND: Raiders of Sophie open desert screenshot from Steam
Low cover / high visibility

Open Dunes

Open desert is movement space, not safety. It gives Tramplers room to maneuver, but it also exposes smoke, engine noise, and approach direction.

Route Use
Cross dunes with a reason. Avoid stopping in open sightlines unless you are baiting, repairing behind terrain, or using distance to break contact.
Evidence
The official site describes Sophie as a desolate desert world navigated by customizable Tramplers.
SAND: Raiders of Sophie mounted weapon combat screenshot from Steam
Information / third-party risk

Combat Sound and Trampler Contact

Distant cannon fire and moving Tramplers are map information. They can reveal opportunity, danger, or a baited fight.

Route Use
Do not chase every sound. If your cargo is valuable or your crew is split, sound should push you toward cover or extraction, not automatically toward combat.
Evidence
PC Gamer describes SAND as a noisy Trampler-driven PvPvE experience where distant battles can be heard across the map.

Route plans

Use these as decision templates. They are not guaranteed spawn routes.

First Raid Loop

  1. Open Dunes
  2. Small POI
  3. Cargo Return
  4. Evacuation Zone

Use this for learning. The goal is to understand Trampler parking, safe looting distance, and extraction timing without chaining too many objectives.

Resource Hunt Loop

  1. Named POI
  2. Safes
  3. Upiors
  4. Second POI or Extract

Use this when looking for Coral Chunks and Weird Coral. The route is slower and louder, so set a hard exit condition before the first stop.

Storm Dive Exit Loop

  1. Map Check
  2. Door Icon
  3. Radio Tower
  4. Cable Pickup

Use this when extraction timing matters. In Storm Dive, available towers can change because radio towers become active later and are single-use.

Voyage vs Storm Dive extraction planning

Voyage

Radio towers are more forgiving because active towers remain available; use the mode to learn route rhythm and extraction approach angles.

Storm Dive

Extraction planning is stricter because towers become available after the timer reaches the door icon and are single-use once activated.